

How To Fix Volume Button On Ipod Nano 6th Gen
A friend of mine had an iPod Nano 6th Gen that wouldn't turn on when you press the power button. I will document what I did to fix it here. This article may also be useful for those looking to dismantle or fix their iPod Nano 6th Gen since most of the steps contained here will allow you to access all components of the device. By performing this fix, there is also the chance that you may damage your iPod, so beware of this before you attempt to DIY. I cannot be responsible if you make a mistake! I have fiddled with very small things and have done things that most kids wouldn't ever do (and adults think is a useless activity), so I can sometimes invent a creative way to make something work.

You may be looking at the iPod and wondering how on Earth is it possible to open something with no visible screws? It actually isn't too difficult when you know how. I'll try to do a step-by-step article 🙂 Please note that fixing the power button will either require you to make a very small "button" to glue onto a small component, or you will need to buy replacement iPod parts.
1.) You will need tools. Preferably you would buy some plastic opening tools from eBay since they are less likely to damage the device. You will also need a small Phillips head screwdriver, usually found in a $2 jeweler's screwdriver set. A pair of tweezers is good for placing tiny components. A heat source is needed; you can use a hair-dryer, heat gun or just a standard fan-heater. For this fix, I also used "Super-Glue" and contact glue (or rubber cement).
2.) Heat up the iPod using the heat source. You should heat it up until it is warm, but not too hot to touch. Do not overheat the device or you may damage the screen or battery. I used a bathroom heater on the highest setting at a distance of about 10cm. Keep the heater nearby in case the iPod cools down so you can re-soften the glue.
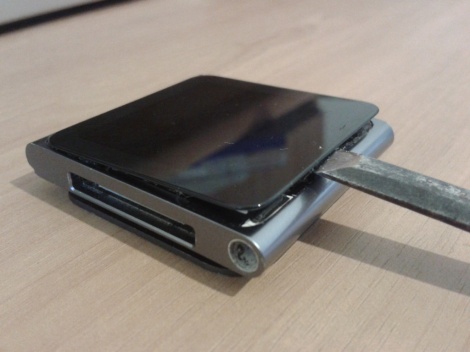
3.) When the iPod is nice and warm, place it so that the dock connection point faces you. Using the plastic opening tool, gently pry up the right side of the screen. Don't force it up or you could cause a crack internally which will give you a screen that looks like one of those "Cracked Screen" phone apps. If you look into the gap, you will see the glue stretching. If you can sever this glue using the tool, knife (carefully), your fingernail or a business card, it will become easier to remove the screen. Once you have freed the top, bottom and right edges of the screen, pull the screen gently towards the right by holding the top and bottom edges. Be careful not to let the screen suddenly detach, as you don't want to ruin the data cables. Once all edges of the screen are free, turn the screen over like you are reading a book.

4.) On the back of the screen is a shiny mirror with which you can glorify yourself. But you're not interested in that, right? 😉 Now looking at the inside of the iPod you will see 2 screws – one at the right and one at the bottom left. Undo these with the Phillips head screwdriver. You will notice that the screws are very small and would love to get lost on your floor, so a small magnet to hold them will keep them by your side. Remove the metal plate by turning it like the page of a book. Note how it clips into the bottom right and left top of the iPod shell.
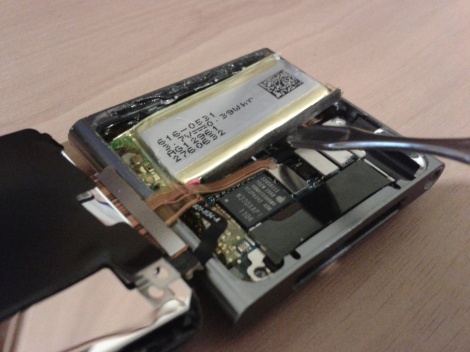
5.) At this stage you may want to completely detach the screen by prying off the 2 left-most connectors in the bottom right quadrant. I chose to leave the screen attached, although this probably made things a little awkward. Now using the plastic opening tool, gently pry the battery out from the right-middle. The heater will come in useful here, however, beware of excess heat as lithium batteries don't like summer. Try to slide the tool under the battery to reduce the chance of it bending. Once the battery is loose, turn it over like another page in this mini-electro-book.

6.) On the top edge of the iPod shell there are some screws hidden under the black rubber gasket. Unscrew the 2 right-most screws and store them on your magnet. Now comes a more difficult step. You will have to carefully loosen the black tape and the ribbon cable from the inside top edge. Loosen it from the rightmost corner to just past the centre screws. You will notice the ribbon cable is bent into an 'S' shape and is stored in a little curved indentation.


7.) Using a small flat head screwdriver, pry out the little metal tab from the middle joint. Once the back edge is clear, gently pull it towards the left and upwards over the ribbon cable. Be very careful not to overstress the ribbon cable as it is very thin. Do not attempt to pull it out too far! You should find that you can now rotate the metal tab anti-clockwise to see the gold button surface mount component. Do not rotate the tab more than 90 degrees or you risk tearing the cable and rendering useless your volume + power controls! It would be a good idea to study where the cable or tab wants to go, and where it resists. Remember how small they are compared to your fingers…

8.) Now for the fidgety bit… I made a very small and thin circular disc or "button" from a piece of thin metal. You could also cut a disc out of thin plastic or a thick sheet of paper soaked in superglue and allowed to dry. The plastic in your driver's licence or ID card is actually too thick! Something half the thickness should do. If you are unsure, use standard A4 paper soaked in superglue. You can always add one more layer if it ends up not being thick enough. The disc should be only around 1.5mm to 2mm in diameter. A square may suffice if you have trouble with the circle. If you can, try to get a thickness around 0.25mm (thanks 'sean').

9.) Once you have the disc made, apply a tiny amount of glue to the disc. Use the tweezers to hold the disc by an edge. You can use superglue, or the more forgiving alternative, contact glue. Don't try applying the glue to the iPod button as Murphy's Law will mean that the glue will go everywhere except onto the button. Now holding the tab on the iPod, place the disc onto the gold button. Most likely the disc will try to stick to the tweezers, so you may have to try a creative way of twisting the tweezers free while still holding the disc down. If the disc isn't on centre, you can re-adjust it before the glue dries. This is where contact glue is better, since it won't have set yet. Let the glue dry for a few minutes to ensure the disc won't move again.

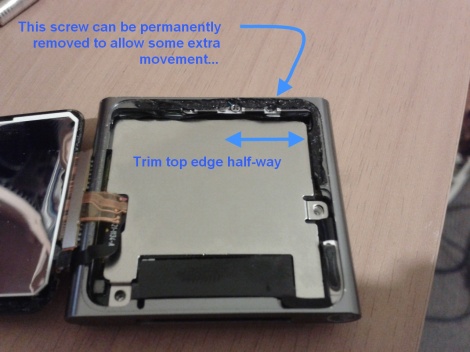
10.) You should re-connect the data cable for the screen so you can test whether the button works. Re-install the metal tab by sliding it back into the corner and back over the ribbon cable, being careful not to twist or crush the cable. Insert the screws and tighten them. Try to turn on the iPod. You should be able to see the screen light up from the back side. If the screen turned on while you were tightening the screws (that's me!), your disc is too thick! There is a remedy for this – remove the rightmost screw permanently, as it allows a bit more movement. If this doesn't work, unfortunately you will have to try to remove your disc and make a thinner one. This is where contact glue shines again, as it is easier to remove than superglue and won't rip out the button.
11.) If everything went well, then you can re-set the ribbon cable and the black tape, then re-insert the battery. Then you can re-install the metal plate, making sure it clips in, especially at the bottom right. Press down there carefully with the Phillips head screwdriver if it doesn't look flat.
If you had to permanently remove the screw near the button (me), you will need to trim the metal plate near the button tab to allow the movement. Use sharp scissors that aren't loose and wobbly, since the plate is stainless steel.
12.) Now you will need to make a decision about whether you keep the black gasket, or whether you remove it and use contact glue instead. If the gasket is in good condition and isn't twisted or lumpy, then you can carefully slide the screen and the data cable into the left side of the iPod. Finally, fold down the rest of the screen and press it down at the edges. You should not be able to slide your fingernail under the screen.
If you found the gasket to be in bad condition, you will need to carefully remove it by scraping with your fingernail and/or the flat head screwdriver. Once it is gone, insert the data cable into the iPod's left side and hold the screen up with your finger and thumb on the top and bottom edges of the screen. Now comes a tricky part – try to apply the contact glue onto the edges on the iPod shell. Don't apply too much or it will squash out and make a mess inside and out. Slowly lower the screen into position, making sure the little rubber tab on the right hand side slides in. Apply some weights or light clamping for half an hour to make sure the screen sticks well. Don't pile on the weights or you risk cracking your screen.

Complete! Hopefully now you will have a working iPod power button and won't have to use a computer or charger to turn it on! You can now go and listen to "Future World Music – Dream Chasers" to celebrate your achievement! If you killed your iPod, there is new music you can listen to – I suggest 'Elysium Dreams' by Killer Tracks for your blessed iPod. 🙂
I hope you tinkerers found this useful. The power button is something that shouldn't usually fail, but when it does, it is most likely just because it moved out of alignment. This fix should be relatively easy if you tinker a lot like me 😉 If you have any questions or have found another way to fix your iPod, then please feel free to share!
Later guys,
Rennie ♪
How To Fix Volume Button On Ipod Nano 6th Gen
Source: https://rennieash.wordpress.com/2013/02/04/how-to-fix-power-button-ipod-nano-6th-generation/
Posted by: morrissaileforseen.blogspot.com
0 Response to "How To Fix Volume Button On Ipod Nano 6th Gen"
Post a Comment